Gelli printing

I’ve had an 8×10 Gelli plate for a while but since I don’t have a lot of surface space to lay stuff out for drying, I had not tried to use it yet. Recently I found out that Gelli Arts had come out with a couple smaller sizes so I purchased a 5×7 and the 3×5. It is pretty easy to use the smaller one for smaller projects and I was able to do so with my limited space.

Today I used the 5×7 size. I have it here on this blue cutting mat I got from a dollar store. Easy to clean up and wont damage my Gelli plate. You need a roller, stencils, marking tools and paint. Once I had that gathered up, off I went to create some masterpieces. Well not masterpieces haha but something fun and pretty.

IMG_5819

After playing around for an hour or so I was able to make the following things. Left side is small coin envelopes and on the right are some library card pockets. Some of the coin envelopes are colored on both sides and some I still need to finish. I only did one side of the library card pockets because you wont see the back side when it is glued into a book or art journal.

IMG_5828

These I used some half sheets of 8×11.5 card-stock. It was scored and perforated to be used for cards. I added prints to both sides. Each side is different and I just showed a few of my favorite results.

IMG_5829

Not bad for my first try at Gelli printing. I think I will add some doodle areas or other items to them. Not sure just what yet. I have some library cards, library card stickers and other things to use next time. It was really fun and relaxing so if you have been on the fence about trying this out you should get yourself one. Or you can even search for the gelatin recipe for making your own.

I also wanted to say that there are several videos I have posted on You tube that I have not posted about on here. Several are “happy mail” videos of things that come in the mail. Some are shopping trips to assorted locations for different things. I even have a flip through some of my projects. Please stop by and subscribe 🙂 https://www.youtube.com/user/AFSpouses/videos

Have a great weekend!

My First ATCs – KIF Spring Groove

In my last post I showed the ATC book I made to hold the ATC’s I make and will receive in assorted swaps. Today I am showing the ATCs I made. Once I receive all five from my swap partners I will post pictures of them.

Here is my process for making mine.

I started by mod podging patterned tissue paper to some ATC mixed media cards. Looking back I would have chosen a thicker type of paper or add more layers since it seemed a bit thin at the end. The bit of curling you see here was gone by the final step.

IMG_5035

Next I stamped a butterfly from 7Gypsies onto white cardstock using stayz-on. I colored it in using my Spectrum Noir pens and then covered it with liquid glass (glossy accents) from CTMH. While it was still wet I added some glitter. After it was dry I cut it out, chopping off the legs and antenna. I did this because it would be impossible to cut around those lines and have no white left. You’ll see what I did to fix that in the next picture.

IMG_5274

Here you can see where I stamped the image on to the ATC. This allows me to add the one I cut out over it so the legs and antenna are on the butterfly again. I also stamped a bit of a ruler and some lacy border using grey stayz on. Additionally I used black soot distress ink around the edge of the card.

IMG_5278

My next part on the card was to add some molding paste through a Dylusions stencil. I tinted it green sing some craft paint. When It dried I felt it needed to be darker so I went back in using a green Stabilo chalk pencil. Once I completed those I went over the whole card with mod podge to seal it all in.

IMG_5279

My last step on the front was to add a flat backed pearl accent to a flower on each card. Here you can see all the cards ready to be put into envelopes to send out.

IMG_5280

Here is a close-up of the completed card:

IMG_5281

Here they all are in envelopes waiting for addresses of my swap group. I stamped the envelope and added a bit of washi tape to make it extra fun for whoever receives one.

IMG_5282

One thing I forgot to take a picture of was the back. On ATC’s you are supposed to include specific information about the swap name, your name, etc. I found a stamp on Ebay so I didn’t have to write every little thing out. It was like this one:

atc stamp

I had a lot of fun making them and I hope those who get one of mine like it. Not bad for my first ever ATC’s I think 🙂

Hope you have a wonderfully arty/crafty day!
Lady Blue

Mixed Media Moleskine & Cardmaking for a Good Cause

Last post I mentioned our new Facebook group for Mixed media Moleskine lovers (search Facebook for “Mixed Media Moleskine” if you would like to join). Today I have a page from my first Moleskine for art journaling. I purchased three of these 5″ x 8 1/4″ off Amazon for my birthday. I had a lot of fun with this.

IMG_4867

I used Modeling paste through a sequin waste stencil for the larger circles. The black ones were done with black soot distress ink using a smaller one. The white circles were made using an Inkadinkado stamp and embossing ink then Ultra think embossing enamel on them. Next I went in with the background using a mixture of Inka gold Steel Blue and some old purple colorbox cat eye ink pads I have. There is some grid stamping from a rubber stamp for a bit of extra texture. I wiped the color away from the embossed area with a baby wipe. The vines are some ribbon I have been hoarding and decided to finally use. I think I might have gotten them from Oriental Trading or Paperwishes, I’ll have to check. The moth is a print out onto regular copy paper and colored with big brush Pitt pens (dark chrome yellow, deep scarlet red, magenta, orange glaze, cold grey III). It is attached with matte medium which I also used all over the page before writing the blurb which says “Each person’s sanctuary is special and the art that comes out of it is extra special”

Next I would like to share a link to a worthy project by Jim Hankins AKA The Gentleman Crafter. I love following his blog and looking at all the amazing things he makes with chipboard. He is also on the design team for Graphic 45, I LOVE their products. Jim is collecting handmade thank you cards to be distributed to those who purchase something from the Breast Care Cancer Center Boutique where he works. I think it is an amazing idea and I will be making some cards to send along. If you would like to read the full story and get the instructions and mailing address to send cards to Jim, please click the link here:
http://www.thegentlemancrafter.com/2014/03/project-i-care-help-needed.html

Hope you have had an amazing week of being creative, have a great weekend.

Lady Blue

Hero Arts Blog Hop

Hero Arts is a great stamp company. Today they kicked off a blog hop to get the word out about the new catalog coming out. Go check out Hero Arts here http://heroarts.com/blogs/club/2013/12/16/welcome-to-the-2014-hero-arts-catalog-blog-hop/#comment-267387 to start the Blog Hop, then go to each of the ladies in the Hop to see some wonderful card ideas. I’m making my list of “wants” from the catalog now 🙂 Be sure to comment on each blog to get your multiple entries in for some great prizes Hero Arts is giving away.

Happy Crafting and blog hopping!

Lady Blue

New Art Journal Pages & “Deck of Cards”

Just a couple of new pages I have done in my 8 1/2″ x 12″ art journal.

I was watching a youtube video and someone was making circles on their page using a stencil. I thought to myself “I can make that” (the stencil not the page 😉 ) So I drug out my old fiskars circle template and proceeded to make several circles on a piece of cardstock paper I had covered with clear packing tape. After cutting the circles out I used the stencil on this page to make the assorted groups of colored circles using acrylic paint. I got out a 12 x 12 Crafter’s Workshop stencil “solace” and used Heidi Swap Color Shine in peach to create the design behind the circles. I added a piece of that drywall mesh I mentioned in the previous post and then outlined the circles with sharpie pens that matched the paint I chose. After that I decided they needed to be more defined so I added the black. Down the right side I used a stamp (I cannot remember the name and the packaging is hiding from me right now) which I colored in more with a gel pen. I also used a grey Zig clean color pen around the circles.

IMG_4533

This page I used several colors of Faber Castell Gel stick Gelatos and water to make the background. I got a cheetah print stencil I found at Walmart and used molding paste to create dimension/texture. I dug through my misc stuff basket and found the puzzle pieces, scrap paper edge, music paper, and some line grunge-board scrap. I also used a piece of the paint-able wallpaper I mentioned in last post which was colored using Tim Holtz alcohol inks, then tore to fit where I wanted. I added some “dribble” using black india ink. I found some Heidi Swap 3d letters in my stash that you color yourself and used my hot pink bingo dauber on them. I toned them down to match the page better by using Tim Holtz distress ink in “dusty concord”. I then glued all the elements down using mod podge and Beacon 3 in 1 craft glue. I also used the Beacon glue to create the heart shape which I colored in using a Zig marker. I used more gelatos and zig marker around the page to blend everything together. I wrote my message using Sharpie paint pen and added some alpha stickers. Last I wrote a tiny note about what the page means (because my daughter asked) and added it inside a tiny vellum envelope which I glued to the page by the flap only. Kind of resembles a wall of graffiti I think.

IMG_4534

Finally here are the cards I mentioned. They were cut from 8.5 x 11 cardstock to be used as ATC’s but I never got around to making any. So instead I turned them into this little deck of prompts. I got this idea from a lady (Kiera Goodhand I think? I’ll have to google it…Just googled and its Kiala Givehand, I was close lol) who is selling her “mixed media inspiration deck”. I didn’t want the whole 52 cards in her deck and had other ideas I thought would be fun prompts so I made my own. Plus I am a cheap-ass. I wrote on each one using a sharpie (I hate my handwriting by the way). I covered the back using a layer from a napkin and mod podged them down. I was able to get 8 done with each napkin. After that dried I distressed them using walnut stain and then stamped the edge using a Dylusions stamp. These are pretty fun to flip through to get an idea or like the original creator said, “deal yourself out a few or grab one at random to help kick start or give you some help with a page you are stuck on.” So if you don’t want to mess with glue and all that, go check hers out and buy them.

IMG_4535

As a gift to myself I signed up for an online art class by Donna Downey. I thought long about if I wanted to do this and if I felt the cost was worth it. Thankfully it has a payment plan where its broken down quarterly and that sounded better on the purse strings. Here is a link to the youtube trailer video for that class for any of you who may be interested in signing up or just want to look at some cool art. http://www.youtube.com/watch?v=CwMNr8eutvM

Happy Creating to all of you!
Lady Blue

Shopping Trip and UFP’s…

Ok so first you are probably wondering what the heck an UFP is. Well it is what I am calling my UN-Finished Projects. We’ll get to that in a little bit.

First up is shopping trip, just because it was so fun finding these little treasures today, especially after it being an aggravating morning. Retail therapy is always nice and especially so when it is crafting goodies. I had received an ad in email earlier in the week telling me that Tuesday Morning would have some new Tim Holtz and Sizzix things put out today. Coincided nicely with the cruddy morning happenings lol.

In this picture we have a nice paper pack by DIY Shop. There is some great paper in there like rulers, wood-grain, ledger pages etc. I think these will look really cute in a mini album. (I’ve been watching a lot of Mini Album instruction videos the past couple days. Love those!) These usually go for $20 at places like Hobby Lobby etc. and even when they are on sale 50% off they still cost more than the $7.00 I spent. haha. I found another packet of the mixed media papers, they had them at 10% off so I got it for $3.19. Next is some cute recipe cards I can use for journaling spots marked down from $8.00 and on sale for a final price of .59 cents. Some cute 7 Gypsies map chipboard alphabet for $2.00, packet of 25 sheets of paper for $1.99 (I laugh every time I buy these since I know even buying a SINGLE sheet from one of the other stores ON SALE would still cost me 25 cents, and I got 25! lol). Last but not least is what I was promised to find by the add is a lovely packet of Tim Holtz embossing folders. One is a bingo card and the other is random things and is called Patchwork. These go for $10.99 and I got them for $4.99. They had several other ones and also the die cuts but I didn’t see any that insisted I take them home. One thing not in the picture was a three pack travel style washi tape on sale for .39 cents.

IMG_4335

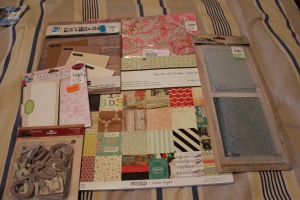
This next picture is the goodies I was not expecting to find but made me all giddy. The center section and the bulk of the pile are products from Inkssentials by Ranger. Top left of that area are two of each color of foil tape. (silver, gold, copper) These lovely tapes go on the sides of the frosted glass slides you see directly below them. The tapes I got for $1.99 each and the slides were only .99 cents. (regularly $5.50 and $6.00). Next to those on the right are Memory Frames. These allow you to make cute little charms, ornaments, or even necklace by adding memorabilia filled slides inside the pre-made frames. Two different sizes were $1.99 each. On the far left side are some pink slide frames. That is actually a three pack of items. The frame is the top, under that was a packet of star shaped eyelets in Christmas colors and the bottom packet was plastic circle charm things with Spring sayings on them. These were marked down and on sale for a final price of .39 cents each. WOW huh lol. Far right side is our final items. These are the T shaped pins used for sewing but I thought they might be handy in crafting since they were pre-colored blue and green. They were bundled three to a tag for only .99 cents.

IMG_4337

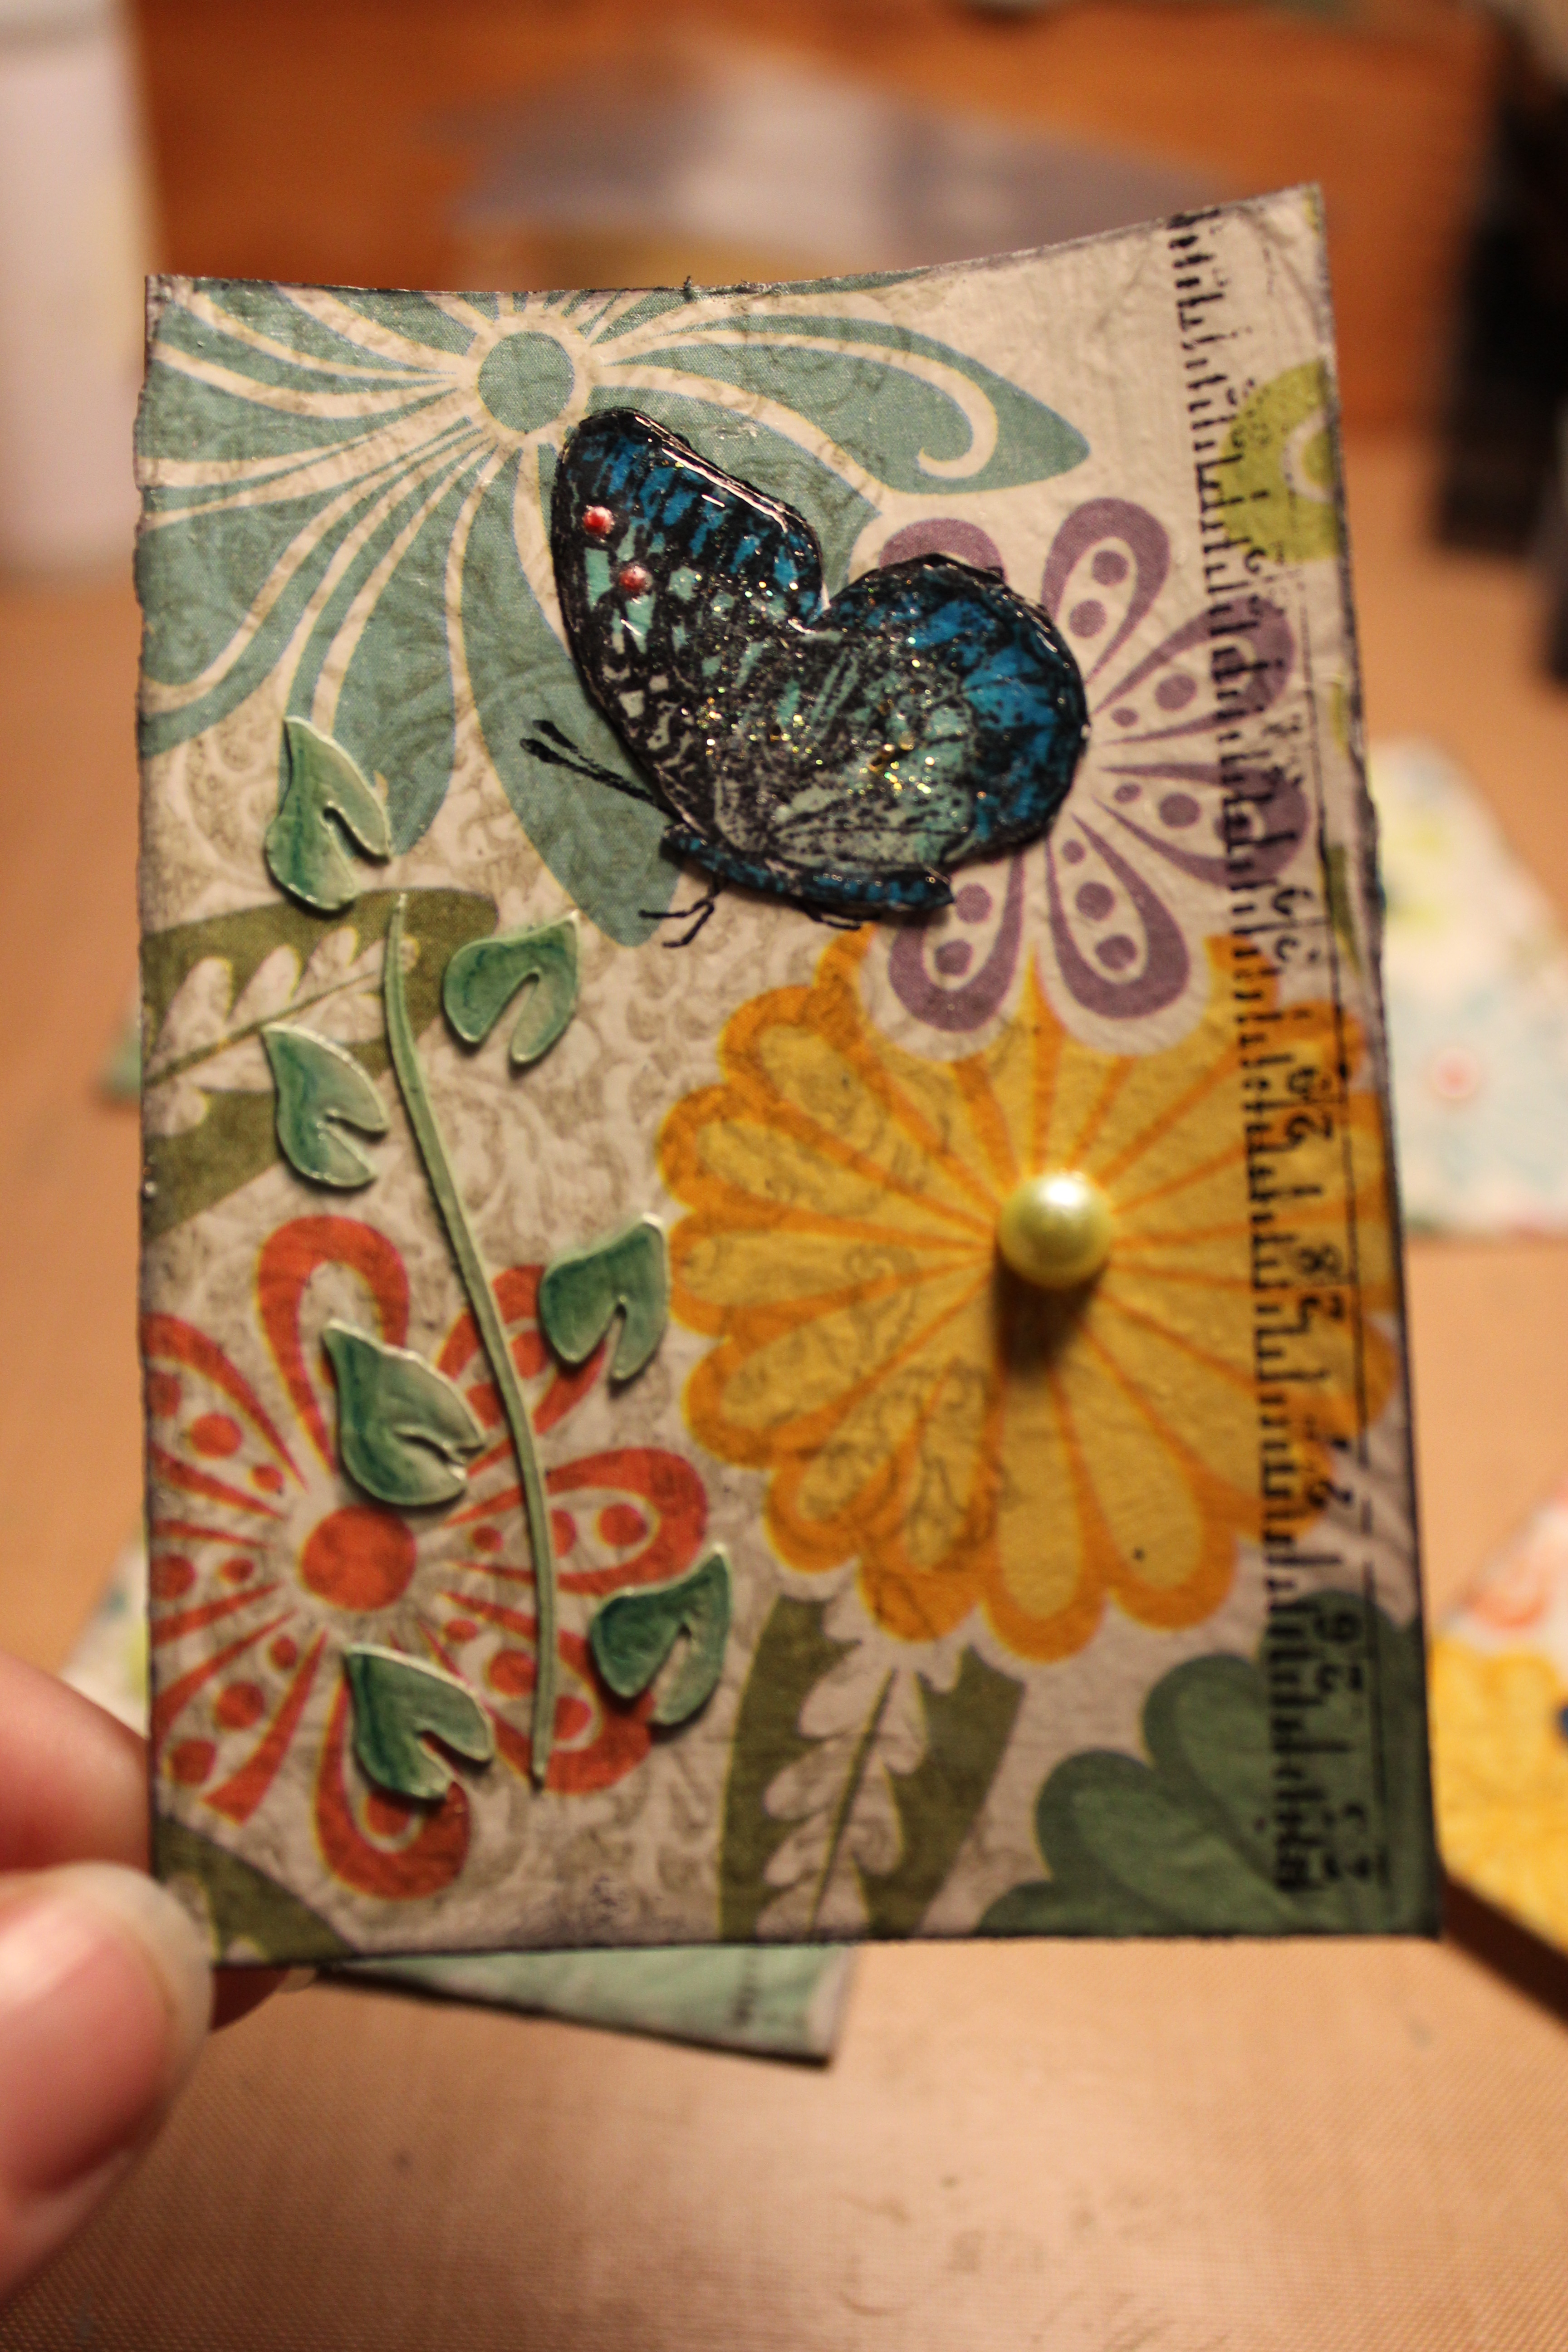
Ok now on to the UFP’s. I found these cards half done in my stash, left side, ignore the card on the right since I haven’t decided yet on that one. I was still trying to decide what to do with the little blue rectangles I had added the thank you stickers to. Did some digging around in my papers and found one that worked perfect.

IMG_4315

So here are the finished cards, I made 14 of them. Something new for me, I wrote down what I used to make the cards. A friend of mine does this on her blog and I figure its a nice way to let people know in case they want to try and rush out to find something to buy lol. So the “perfect paper” I found was the paisley called Cowboy Paisley by Chatterbox Inc. (found this awesome paper in an entire 25 sheet pack from Tuesday Morning!) I put that on some random card-stock in my stash, its kind of a dark green although you cannot tell very well in the picture. It was one of the colors in the paisley paper. I also cut some pieces of textured card-stock (also random brand and color in the paisley) in a burnt orange color. I distressed all the edges with Tim Holtz inks in Tea Dye color. I used a decorative corner punch on the blue “thank you” part to make it prettier. After adding all the paper parts to the card I added a double layer of mulberry paper flowers by Prima with a Recollections Faux pearl sticker to the center.

IMG_4317

Turned out pretty cute and I’m glad to have marked a UFP off my list!

Hope everyone has a great crafting week!

Lady Blue

New Address Cards

So back on this post in January https://bluecrafty.wordpress.com/2013/01/03/punches-and-organizing/ I showed some houses and clouds I had made and was planning on making them into cards to tell friends of my new address once we have moved. Today I got down to work on completing those cards.

IMG_2206

Digging through my goodies I came across some great paper to use. Also some fibers, paper flowers, and of course pens to color the houses with. I also have some colored brads and washi tape with key images.

I cut 8 1/2 x 11 cardstock in half to make two pieces 8 1/2 x 5 1/2 and then scored and folded it to make a card 4 /14 x 5 1/2 (a typical card size). Next I used CTMH ink pad and a sponge makeup applicator to apply a little denim blue to three edges of the tan-colored paper. I attached this and the patterned paper to the front of the card. Then I put a strip of washi tape across the meeting point of the two papers. This is a great way to hide any miscuts or gaps. Ribbon works great here too. On the houses I added some color and then CTMH Liquid glass to the windows to make them glossy. Next I inserted a brad through the flower and also through the “home sweet home” tag. I attached these to the card front along with a cute cloud and TADA card done:

IMG_2208

When it came time to use the fibers to attach the tags I decided it was going to be more of a pain than fun so I left them out.

As for the plan of making some Valentines with the hearts I cut out, it just did not happen. I don’t usually send any cards out and only give one to my husband so I didn’t feel very motivated to get them done. I will find another good use for them I am sure.

My new thing I have been looking into is mini albums and altered art albums. Pinterest has tons of great ideas and some wonderful tutorials other crafters have made to make things easier to figure out when making for yourself. I need to find a place that sells a certain kind of 12 x 12 chipboard to do one of the projects I found. I’ll check that out after I have moved.

Happy crafting!
Lady Blue

Punches and Organizing

So to follow my post from yesterday. As I said before I was at Michaels since they were having a great sale. One of the things I picked up from there was a heart shaped punch made by Recollections. Like the one shown here but in a larger Heart size http://img2.etsystatic.com/000/0/5887157/il_fullxfull.310248666.jpg They were 50% off so I also picked up a star shaped one. I love these punches since they have the nice hinged lever and it doesn’t kill your fingers or hand to punch lots of items out. I also like to flip the punch over so I can see where I am cutting the paper. This punch replaces the one I purchased many years ago from Creative Memories:http://ecx.images-amazon.com/images/I/214WJt1vhZL._SL500_AA300_.jpg Love the shape of the heart but it was truely annoying to use this punch!

So I had lots of fun with my punches and got some hearts ready for one of those card inspirations I posted yesterday. There are quite a few in each of those stacks.
IMG_2030

During my sorting I found these houses, clouds and home sweet home, stamped images I had done that I will be using for my “I’ve moved” cards.
IMG_2031

Lastly I mentioned wanting to have a binder of some sort that I can stamp my images into for easy flipping through to see what I want to use and get inspired. I ran accross this one I had started as a recipe book (that went nowhere haha). It is a half sized binder so easier to tuck away on my shelf. I will be making new labels for the tabs once I figure out how I want to categorize my CTMH stamp sets.
IMG_2032

Stay tuned to see how I use my punched hearts, houses and setting up my binder system.

Happy crafting!

Lady Blue

Happy New Year!

One of my resolutions/goals for the new year is to do something craft related each week. I decided that since I am moving later this year, sorting and getting rid of things I don’t like anymore or not using, qualifies as being involved with my craft items.  Yesterday I went to Michaels and purchased 3 photo boxes. (they are on sale right now) I went through my ribbon and put it in one box. Another box I gathered up my chipboard book parts and put them in there. The third box I filled with paper flower embelishments. For the boxes I already had I went through and made sure that what the label said was actually in the box. I added more of the same item to a couple and rearranged a bunch of things to make it fit better in my craft cabinet. I went through my 8 1/2 x 11 cardstock and put it into binders. I also want to get a small binder (or repurpose one I already have) and have a page for each stamp set I own. I want to stamp the images on the page and have the stamp set name plus its location so I can find them easier when I need them. Also by having a visual aide I can hopefully find inspiration easier. 

Two cards I am working on making:

The first one will be the ones I send out when I get to my new address to let everyone know what it is.  The second one I am making for Valentines day. I have seen several really cute ones on Pinterest that use heart punched shapes. I have punched out a bunch of hearts from several kinds of paper.

this one http://pinterest.com/pin/244531454739460504/ 

or this http://pinterest.com/pin/244531454739446918/

or perhaps this http://pinterest.com/pin/34902965833939660/


Have a great New Year!

Lady Blue