KIF Halloween ATC swap

Last month I participated in the Halloween ATC swap through Krazy Island Family (KIF). This is a facebook group started by Claudia Rossi for fans of her youtube videos. It is a great group and I have learned so much from people there. I have also made several art friends through it.

Anyway on to the ATC’s. The swap has been finished for a couple weeks so my partners should have received their atc’s by now and I wont be ruining the surprise for them.

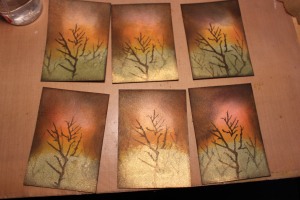
I started off by laying down some background color. After I got an effect that I liked I went in with a stencil and black distress ink. I used it with less ink on the applicator to get the background “ghosted” trees.

IMG_6191

Next I used walnut stain distress ink to darken and bring in the edges. I’m going for a late sunset appearance.

IMG_6192

Next I used some pearl color modeling cream by Viva through a star stencil to create the night sky. I also used some embossing ink and powder with a CTMH stamp I have for the ghost. Additionally I decided I wanted the middle tree part to be more black so I used some black gesso over it.

IMG_6193

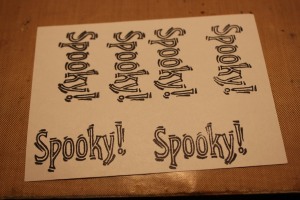
From the same CTMH stamp set as the ghost, I choose the spooky word and stamped it on some white cardstock using stazon ink in black.

IMG_6194

I filled in the words using an orange glitter gel pen.

IMG_6195

I found these adorable mummy 3d stickers at Michaels, they were my inspiration for the ATC’s. I needed a “surface” for the little guy to stand on at the bottom of the ATC so I used some liquid pearls in avacado color to create some grass.

IMG_6196

I didn’t want to just glue on or use dimensional foam to attach my little word so I chose one of the Tim Holtz tiny paperclips. You can also see where I have added just a tiny amount of green to the ghost eyes.

IMG_6197

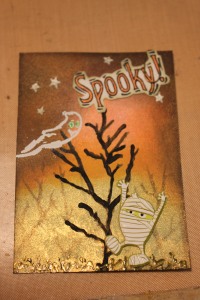
And there we have it all completed.

IMG_6198

Here is all of them together. I included a couple of Halloween themed napkins in with my ATC as a little treat for the recipients. Napkins make great background layers on projects.

IMG_6199

Lastly we have all of the ones I received along with mine. I love each person’s ideas and how they incorporated them in. From sewing to using a hot glue gun to make webs. And even an unusual wood backing (center one) that I have never seen before. They look great added to my collection.

IMG_6522

I really enjoy doing these ATC swaps and cannot wait for the next one.

Busy Bee

Holy cow, school started back up for both of my kids and I haven’t been able to do much of anything lately lol. I have participated in some individual swaps with ladies I have met through the Facebook Krazy Island Family group. A couple of them wanted to trade napkins and also some braille paper. Both of these items can be used in layering for mixed media projects. A few days ago I went to visit a Goodwill to see if they had anything fun. Usually I go and end up disappointed because there isn’t anything art related like I see other people find. This time I did find something.

IMG_6023

The large item in the back is 18 x 24 inch vellum paper used in drafting. There is six sheets in the package and I thought they would do nicely in a junk journal. The art set was only missing the plastic tray and two of the brushes. The watercolor paints and paper pack had never been used. The pack of index cards are pre-printed with job contact info, project steps etc. These will be going into junk journals and also ephemera trades. The pack has three different colors. Next to that is a small blue dish. I think it may have been part of a candle holder set or something. I didn’t see anything for it to go in and they had it individually priced so I got it to add to my blue glass collection. Next to that was another item that wasn’t with the rest of what it should have been with. I do believe these are square lids for containers. They are made of glass and they have a plastic “gasket” to seal in freshness. They had these taped in sets of three so I nabbed a pack. I am going to use them as mixing dishes for paint etc. Finally I found a nice old dictionary that has the thin paper pages. My total for all of these items with tax was $13.00, not a bad deal.

I think it has been long enough that I can show my ATC’s I made for a swap. Here you see them all completed.

IMG_5903

This image shows a close up of the coral and shell along with the sand. The images came from napkins I cut up. I mod-podged them to the card. After they were dry I went back and added some white dimensional paint to the coral. I also added a little bit of sand using liquid glass as glue.

IMG_5904

This image gives you a better look at the little cloud. I made this by wiping away gelato through a stencil. Then I added the grey from an inktense pencil.

IMG_5905

I did have a surgery on my jaw a few weeks ago. It has healed well. Time will tell as the swelling goes away if it has improved my issue. That’s about it for me lol.

Hope you are having a great week so far! Here is a link to a free printable for some collage bits and tags http://www.paperwishes.com/images/products/4232.pdf

ATC Swap and a Page

I’m in the Lifebook class and was able to sign up for a couple ATC swaps. The first one was daily ritual. I don’t do anything meditative or ritualistic in the sense that some others may do but I do have a cup of coffee every morning, love checking the mail, feeding the squirrels and birds, and watering the plants. So I incorporated some bits to my ATC’s to represent those activities.

Here you see my completed cards. I made a set for my swap partner and a set for myself. The criteria was to make two cards for our one partner. The background was made with craft paints and using a natural sponge to dab it on. I also used some Graphic45 stamps.

IMG_5815

Here is a closeup of my little coffee cup. I cut it from brown paper and used pencils to color it. The coffee is LuminArte Silks glaze. The steam is Liquid Pearls. The little plant is highlighted on the flowers with Stickles.

IMG_5816

This next picture shows the tiny vellumn envelope that I put a heart, plant leaf, and water droplet confetti inside. The piece of “air mail” is a sticker.

IMG_5817

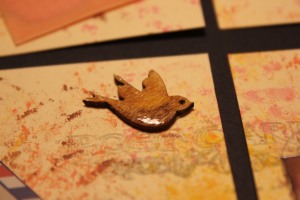
Here is the little wood veneer bird by Studio Calico that I added. I colored it then added some Liquid Glass over it.

IMG_5818

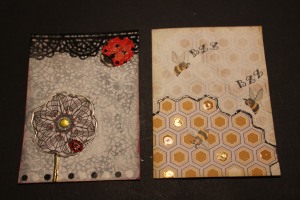
The next set of ATC’s I only made a set for my swap partner and not one for myself. This theme was bugs and insects. For the left side card I took some patterned scrapbook paper and added it to the ATC card. I then used some watered down gesso to mask out a single shape for a flower. I used Liquid Pearls to decorate the flower and give it a stem. Across the top I added some lacy cut paper tape. On the flower and the tap I included a ladybug sticker. They were both covered in Liquid glass with a tiny bit of glitter. along the bottom of the card is a piece of rub on. The right side card I cut a piece of scrapbook paper that looked a bit like honeycombs. I added a line of black liquid glass to divide the card and added watered down gesso to mask out the background. I also used some Liquid Pearls and Liquid glass on some of the individual chambers. The bees are stickers and I added liquid glass to their wings. The Bzz Bzz is using a Studio G stamp set (the dollar bin ones).

IMG_5830

Yesterday I felt inspired to do a page in my spiral bound art journal. I used gelatos to create the background colors. I then used some modeling paste through a checkerboard stencil. I also sprayed some color through it. I used Stazon ink trough a swirling stencil to add a pop of black. I took some of the deli paper flowers I showed a couple posts back and attached them to the page with matte gel medium. I also cut apart some die-cut shapes (the circles) which I colored using distress ink in Dusty concord. After everything was dry I high-lighed the flowers and shapes using my Faber Castell big brush pitt pens

IMG_5883.

I had a lot of fun making these projects. It felt good to get another page done in my art journal too. My Mojo seemed to have run off in regards to that aspect of my creativity and was only centering on making recycled materials books. I even got part of my week 15 page for 48 weeks done. Today it’s on to continuing it and hopefully get that posted in a couple days.

Hope everyone is having an art/craft filled week.

My First ATCs – KIF Spring Groove

In my last post I showed the ATC book I made to hold the ATC’s I make and will receive in assorted swaps. Today I am showing the ATCs I made. Once I receive all five from my swap partners I will post pictures of them.

Here is my process for making mine.

I started by mod podging patterned tissue paper to some ATC mixed media cards. Looking back I would have chosen a thicker type of paper or add more layers since it seemed a bit thin at the end. The bit of curling you see here was gone by the final step.

IMG_5035

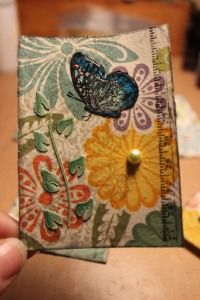
Next I stamped a butterfly from 7Gypsies onto white cardstock using stayz-on. I colored it in using my Spectrum Noir pens and then covered it with liquid glass (glossy accents) from CTMH. While it was still wet I added some glitter. After it was dry I cut it out, chopping off the legs and antenna. I did this because it would be impossible to cut around those lines and have no white left. You’ll see what I did to fix that in the next picture.

IMG_5274

Here you can see where I stamped the image on to the ATC. This allows me to add the one I cut out over it so the legs and antenna are on the butterfly again. I also stamped a bit of a ruler and some lacy border using grey stayz on. Additionally I used black soot distress ink around the edge of the card.

IMG_5278

My next part on the card was to add some molding paste through a Dylusions stencil. I tinted it green sing some craft paint. When It dried I felt it needed to be darker so I went back in using a green Stabilo chalk pencil. Once I completed those I went over the whole card with mod podge to seal it all in.

IMG_5279

My last step on the front was to add a flat backed pearl accent to a flower on each card. Here you can see all the cards ready to be put into envelopes to send out.

IMG_5280

Here is a close-up of the completed card:

IMG_5281

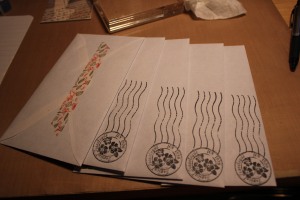
Here they all are in envelopes waiting for addresses of my swap group. I stamped the envelope and added a bit of washi tape to make it extra fun for whoever receives one.

IMG_5282

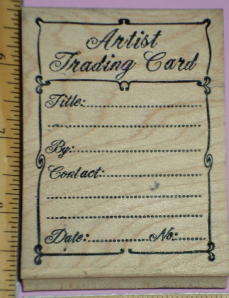
One thing I forgot to take a picture of was the back. On ATC’s you are supposed to include specific information about the swap name, your name, etc. I found a stamp on Ebay so I didn’t have to write every little thing out. It was like this one:

atc stamp

I had a lot of fun making them and I hope those who get one of mine like it. Not bad for my first ever ATC’s I think 🙂

Hope you have a wonderfully arty/crafty day!
Lady Blue

Week 12 and ATC Book

I completed week 12 last week, here is Donna’s version:

week12

Here is my version:

IMG_5026

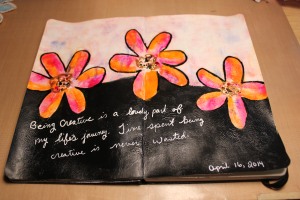
I also did it in my moleskine journal using the leftover paints.

IMG_5030

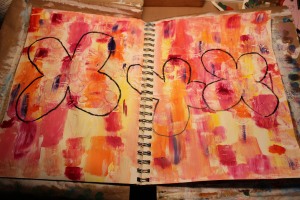
Here is my process. First I added some background texture using modeling paste and a stencil. Then I added all kinds of yummy color on the page. I chose colors I thought would look good peeking through after the next step.

IMG_4976

Next I made flower outlines:

IMG_4978

Then I painted in half of the page using black acrylic paint mixed with glazing medium. I wanted the glossy look:

IMG_4982

I had a bunch of paint left over so I prepped a page in my altered book. This is the beginning of a black and white page.

IMG_4981

I added white paint to the top of the page and used a white pen to write the quote on the bottom.

Here are some close-ups of the flower details. I used an assortment of paints, India ink, and pens and also added dimensional dots using liquid pearls. You can also get a better look at the underlying texture on the page.

IMG_5029

IMG_5027

IMG_5028

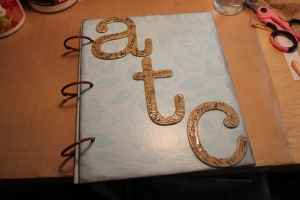
One of the other things I have done is this ATC book. What is an ATC? It stands for Artist Trading Card and they are the same size as baseball cards. Think of them as mini canvases of artwork. One of the groups I am in on facebook (same one doing the altered book project) is having an ATC swap. This will be my first one. I wanted something to store the cards in that I will make (you make one for yourself along with the ones you send out) along with the ones I will receive in the mail. I took apart a smash book type album I found on clearance at Hobby Lobby and used the covers for it. I recovered it using scrapbook paper I had in my stash. Next I distressed the edges and covered it with decou-page. The letters are chip-board and also from my stash. I covered them with printed tissue paper using the decou-page and then put a coating of UT over it. I glued them to the page and then re punched holes that would work for 3 rings instead of the wire bound holes originally in the book. The final touch is the nice red 7gypsie rings I got for a great bargain at Tuesday Mornings a while ago.
IMG_5275

Here is the inside where you can see the page where the ATC’s will be inserted. The left hand page has a pocket on the other side. You can see the original hole configuration here. Additionally in front of that are two pages with lines that I can write in the different swap theme names and dates.

IMG_5276

I am working on my ATC’s right now, just got my stamp in the mail that will go on the backs. Once I finish I will post some pictures for you to see.

Hope you are having a great week being artsy or crafty 😉
Lady Blue