Aboriginal Art Inspired Drawings

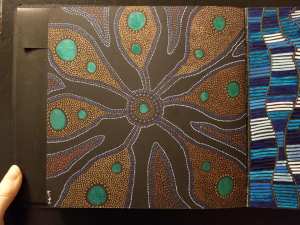
Before Christmas I was in a group chat on Facebook and we were sharing a couple images we found on Pinterest of some Aboriginal art that was done. One of the ladies in the chat challenged a couple of us to do some work like the picture. I was the first one to complete that challenge with the following work:

It was very fun to do and since then my muse has been super happy. My friend Vickie and I have been poking each other’s muse sharing the different new images we have come up with. Well that has in turn inspired several other friends to jump on the challenge and I personally know of four or five others doing something similar. We are all using black paper as a background with the exception of myself adding in a few here and there done on colored cardstock from my huge paper stash and I think another using white paper. I hope this continues on and spreads around to inspire more people. Some of the artists you can go check out on Instagram at the following names:
ginabahrens (shes doing retro styled ones that are fabulous)
pegarobinson
vapurl

Below you will see several of the pages I have completed. At the bottom of the post will be links you can use to go find some of the products I have used. Happy creating!

Dylusions Black journal: https://amzn.to/2RWqsxx
Uni Posca Paint Pens: https://amzn.to/2MhwIL2
Gelly Roll white gel pen: https://amzn.to/2T7mwYl
DecoArt glass paint markers (just one of the colors you can search for more) https://amzn.to/2sxZhe7

Three Inspiration Wednesday Pages

As you already know I have been getting ready to move. I have been doing my IW2015 pages and keeping up with them as a release from all the stress involved with having to have 13000+ pounds of belongings packed up by strangers. I really hate having them mess with my things but it has to be done as I am not capable of packing and moving all of that on my own lol.

So on to the pages. I mentioned I was already working on one in my last post and this is what I came up with.

I carried the gold I used on the last page over to this one. Donna used a word spread over her pages so I chose to use the one I picked as my word for the year. I mentioned this in my post back in January when I started DLP2015. My word is completion. I really love how the colors look like some old patina.

IMG_7300

Here you can see how the letters are on the page. As always, if you click on any of my pictures you can go to the full sized image where you can really zoom in and see the details.

IMG_7302

I really love how the gold caught on the texture and letters.

IMG_7304

The next one I completed was pretty fun. It has a bit of a soft grungy look to it. Donna used sprays on her page for her black portion, I went with Acrylic paint.

IMG_7466

I used a rub-on here

IMG_7468

Here you can see some of the book text I added to the page.

IMG_7469

Lastly my third page. I think this is one of my favorites so far. The background is bits of papers from my scraps. One of them had the word Lucky on it and was part of some mail I got from an order.

IMG_7477

Got some great drippage going here. Look at how fun the drywall tape backing is.

IMG_7478

Used a Pico Embellisher for these circles and added shadow with my inktense pencils. They really pop from the page and add a nice bit of extra dimension.

IMG_7479

Hope you enjoyed seeing my pages and thanks for stopping by. Apparently this is my 100th post on the blog so woo me party!!! Just kidding haha.

Managed to squeeze in some art.

Along with sorting and cleaning to get ready to move I did finally manage to squeeze in a little time to work on a couple of pages in my Inspiration Wednesday journal. I also have a third page in progress.

In the spirit of a new home and place to explore I came up with “Begin Anew” as my words for this page. Here you can see the left half of my inclusion. I had to tape it in because I dont have inclusions since I am using a Moleskine sketchbook

IMG_7285

Here is the right side

IMG_7286

The circular areas come from cutting circles from some textured wallpaper I received in a swap. I arranged them in a way I liked and adhered them down in the same manner that Donna did in her video. Yummy texture on this one.

IMG_7280

This next one encouraged us to use up some paper we have been hoarding. Again no inclusions and I didn’t want to tape another one in so I came up with the little booklet on the right page. Donna had done some glazing in her video and I didn’t feel like doing that so I just used distress ink and some gold coloring on my molding paste on the left side. I might come back in with a gold pen and do some journaling around the curved line.

IMG_7294

Really hard to capture how the gold and the distress ink look like a patina on these lines

IMG_7299

Gotta have a brown hole, what better place to add some of that yummy gold coloring. My two little dictionary pages were chosen based on the words they have. Home and Peace, which is what I will have in about 60 days 🙂

IMG_7298

Thanks for stopping by

DLP Week 8

Week eight??? wait a minute… Yes week eight lol. Week six I am still trying to sort out and week seven I haven’t felt inspired to do yet so I have left a space for it and have gone on to week eight. My journal I can do it in whatever order I like right. 🙂

The theme for the week is repeating elements. So I decided I wanted to use circles and the color blue. I of course put down a layer of gesso to start off. Then I came in with my largest circle stencil and my darkest blue, Paynes grey.

IMG_6959

To give a few of those circles some added interest I covered them with Aleene’s Paper Glaze. This is sort of like glossy accents but not dimensional.

IMG_6961

Next I chose a couple more lighter shades of blue and two more stencils that I cut myself and added this dotted “stripes” and random clusters. I made sure to have them overlap each other here and there.

IMG_6960

Now while I am working on this I am watching the rare snow occurrence here in Louisiana. It put everyone out of school for three days haha. Back in Wyoming this would have been no big deal. Here however they do not have the equipment to handle this type of thing so its just safer if everyone stays home. It was pretty to watch but I’m glad I did not shovel it or go play in it. brrr

IMG_6963

Next I added more circles using the center of a used up tape spool and also my finger. The rings were thicker paint and they added a nice bit of dimension to the page. I think using the metallic paint also adds some nice interest.

IMG_6969

IMG_6968

To finish it off I dabbed some tiny dots through my smallest stencil, some dots with a q tip in groups of three and also used some liquid pearls in groups of three and four. At this point I thought I was done.

IMG_6971

As I was working on my Inspiration Wednesday page and was using my new script stencil I decided to use the extra molding paste on this page too.

IMG_6976

Now I can call it done.

IMG_6975

Here is my completed Inspiration Wednesday page I was working on

IMG_6977

Thanks for stopping by

Documented life week 5

Week five was Under papers and what lies beneath. I don’t put papers on my work surface due to the lack of space at the moment but I do use them behind my pages when working in a book. I did have in my stash of things a paper I had used to try out some foam stamps I had made. It also had some sprays tested on it.

First of all I created this ombre type background using black and grey acrylic paint and some white gesso. I got this idea from my lovely daughter. I chose these colors to offset the colorful nature of the papers I was going to layer on top.

IMG_6809

I tore the papers lengthwise and rearranged them on the page so that they were not next to what they previously had been before. I used soft matte gel in a precision tip Fineline applicator bottle to glue them down. I did not make sure they were down at every little spot.

IMG_6810

I knew I needed something else to go on the page so I rummaged in my stash and found my word stickers. This is the “Just Because” set from Cosmo Cricket. I picked out some that went with what I was feeling for the theme of the week and where the page was going. If you click on this picture below you can get the full sized version where you can zoom in and read all of the stickers used.

IMG_6811

Here is a close-up of a couple of the stickers used. I coated the top and just over the edge with some more of the soft gel, just to make sure they stuck down and to add a bit of gloss to the matte look of the page. You can also see some of the colors that were on the paper I tore up.

IMG_6812

IMG_6814

Hope you like this weeks page. The next one is really yummy! Stayed tuned.

Documented Life 2015 Week 4

This weeks idea and prompt was writing and words with friends. I immediately thought of the game on my phone I play with some of my friends so I dug out some scrap book paper I have been hoarding, ripped it up and glued it down to the page. I added some gesso over it to push it to the background and then I wrote some stuff down about friends. Next I added a bit of modeling paste through a stencil. I went over that and the rest of the page with some acrylic paint and more gesso to push the writing into the background.

IMG_6800

I was inspired by my 2nd week of Inspiration Wednesday (plus I still had some of the same bits still on my desk haha) to do a bit of collage. In this page below I used matte gel medium to really stick the pieces down. I wanted to do something a little different with the dlp page.

IMG_6798

So I decided I would only glue it down here and there so that the texture of the crinkled bits and pieces would stick out. I also found a sticker in my stash that had a friend quote on it that went with my bit of journaling. I used distress ink on the edges to make it match with the colors on the page. The quote says “Cling to Worthy Friends ~ Confucius” After that I used some bronze and white paint to make some splats.

IMG_6803

Here is a close-up of some of the bits of paper I used and you can see a couple of the splats I created.

IMG_6806

Here is a nice view of the texture created through the stencil. You can also make out the scrabble tile paper in the background.

IMG_6808

Thanks for stopping by!

Documented Life Week 3

I started off week 3 of the Documented Life Project by using a copy from a book of mandalas. I cut a few of the portions off as I was getting it ready for my page. I originally used some inktense pencils to color the sections and then decided I wanted it bolder. So after attaching it to my gesso’d page, I went over it a bit with more gesso. When I did that it activated some of the inktense and smeared out from the center paper. This is what gave me the idea for what to do next.

IMG_6776

After I got the main color on using acrylics, I felt like playing with some water color. I used colors that seem to work between the main ones I chose. I like how the watercolor effect turned out in many places but feel I could have gotten a better result in others.

IMG_6791

Here is the finished page to include most of the quote that was posted for the week. I chose to use a piece of white card-stock for the word color so it would be in “black and white”. I used a stamp set from Hampton Art with Stayzon ink for the sentiment.

IMG_6792

Here you can see a close view of the lettering. I went over them with a Uniball Signo white gel pen.

IMG_6793

Here you can see an area where I liked the way the watercolor ran around.

IMG_6794

I also liked the look of the water color under the lettering here.

IMG_6795

Thanks for stopping by and I hope you are having a great week!

Documented Life Week 2

Week two of my journal for Documented Life 2015 complete. This was a lot of fun. The item to use was gesso. So I started off by doing a white gesso layer over the whole spread. I have these tiny containers of paint from some old craft or something and I cannot bear to just toss them since they are still good. So I have been finding different uses for them. I used a light and dark orange all over the page. You can also see one of the flowers I am doing. I did not draw these myself. I used a Folk Art rub on pattern kit I found on clearance at one of the craft/hobby stores. It works similar to the rub-ons but it is graphite so you could erase it like a pencil

IMG_6751
After getting all the flowers down I wanted to add I decided it needed a different border so I used black gesso around the edges.

IMG_6752
Next I used some cream and white to paint the petals. I used yellow in the center and then sprinkled some assorted glitter. I covered the glitter with clear gesso which is showing white in the picture as it was not yet dry.

IMG_6753
The flowers didn’t pop off the page so I outlined them with some black pen in a scribbled way and then used two different colors of pitt pen, smudging them together as I went. I decided I didn’t want to use the same quote they had provided in the prompt because many other people were using it and I wanted something unique. The quote they had was “The beginning is always today.” -Mary Shelley. I drug out my quote dictionary and found something about beginning. My quote comes from Alice In Wonderland.

IMG_6754
Along the way of stamping out the quote I made my first mistake. I covered it up using a piece of paper stamped with the correct word and decided I liked that as part of the look so I changed a few of the other words to be on white paper. I edged them with distress ink and attached them with foam squares.

IMG_6764

IMG_6761

IMG_6766

This was a lot of fun and I managed to get it all done in just a couple of hours. It took me four days to figure out what I wanted to do though haha.

Inspiration Wednesday 2015

Here is my first week page for IW2015

IMG_6738

Because I am using a Moleskine sketch book instead of Donna’s journal book, my layouts wont have inclusions and my first page was a two page spread instead of just one. This is because I already have a couple pages started in the book. Anyone who knows Donna knows her love of the brown hole. This is such an inside joke and can be explained with the picture below that Donna whipped up for us to be able to add to pages and blogs etc.

brownhole

The brown hole is in fact the reinforcement ring on the shipping tag, which she adds to each page. If you would like to join in on the fun you can access her site by either of the two links I have off to the right. If you want to purchase the class or any of her products, the top one gives me a smidge of kickback for referring you over to her. There is also a Facebook group for IW2015 located here: https://www.facebook.com/groups/InspirationWednesday2015/ It is a public group and you do not have to have paid to be part of it. You can browse the pages being posted and become inspired without having to see the video. You can also look for #IW2015 on Instagram where many people are tagging pictures of their weekly works

Have a great week!

Documented Life 2015 First Prompt

As I said in my previous post, my word for the year is going to be “completion”. I’ve picked this word because I have many project started and have not completed. So this year is about getting those done and also completing goals I have for my self.

On to the Prompt for this week which was released yesterday Jan 1 2015. They said to use book text, your word, and some goals. So this is what I have come up with (NOTE: Clicking on the individual picture will bring up a full resolution image where you can see more details and zoom in even more)

IMG_6714
First I put down some acrylic paint. I chose Ocean green and Parchment as my main colors and added a little Bright aqua green here and there and around the edge.

IMG_6715
Since I have about a gazillion letter stickers of every type imaginable I chose to use some of those to show my word for the year. I conveniently had some with book text on them. I laid them out on the page where I thought I would like them but not attaching them yet.

IMG_6716
Trying to use more of my stash items I found these frame cut out stickers from who knows where lol and they also had some book text on them. I thought it would look nice to make them into a type of pocket so I could insert the shipping tags. Being they were a frame the tags fell out through the hole so I solved that problem by added a piece of polka-dot velum.

IMG_6717
And here is the finished layout. Since the tags and pockets needed a little extra something I added some washi tape to the tag. Additionally I used some glitter number stickers to label the pockets. Tied the strings on the tags like a pair of shoes and Voila! On the back of the tags I wrote some things I need to complete this year. I also went over the edge of the pages with some Tim Holtz black soot Distress ink.

IMG_6720
Here you can see the book text on the letters and the frames, along with the bit of shadow around the frames I created using a Big brush Pitt pen and smudging it. A tip I learned from Vicky Papaioannou on Youtube.

IMG_6721

Have a great weekend!